How to clone objects in Unity
- Sep 29, 2016
- 6 min read
Sometimes in a videogame, we want to create instances of objects on run time, for example: bullets, cannon balls, enemies, among others. In this post we will show you how to achieve this by implementing a simple multiplayer cannon ball game.

To start with the Unity implementation here is the list of objects that the Scene will require:
1) A couple of cannons (made out of a spheres and cylinders combined with parenting)
2) A projectile/bullet (made out of a capsule)
3) Some terrain (made out of a large rectangle)
4) Some obstacles (made out of cubes)
Cannon:
Let's start with the basic and show you how to combine the sphere and cylinder.
To create the cannon we need to insert the two mentioned GameObjects. Once placed on the scene, you will need to drag the child object on to the parent object in the Hierarchy screen. This will make it look as one figure:
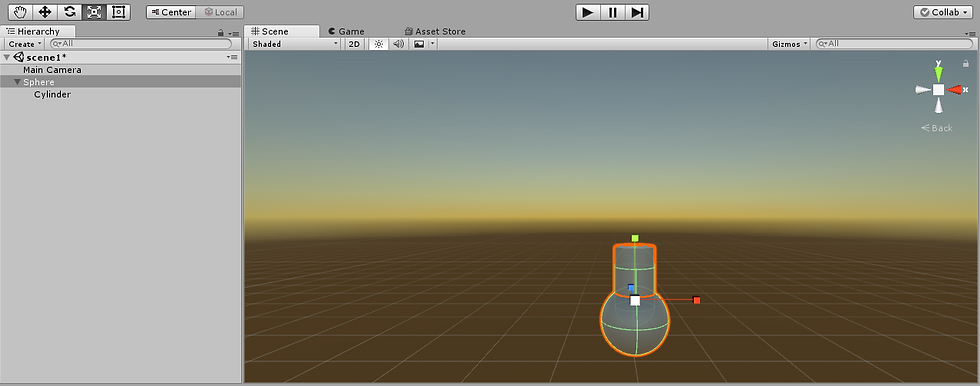
After creating the canon, we should define the cannon movement with a C# script. This will allow the canon to move on one axis (left to right) and to rotate on one of its axis (up and down). Please look at the following script to obtain this behaviour.
using System.Collections;
using System.Collections.Generic;
using UnityEngine;
public class Cannon : MonoBehaviour {
public float speedX;
public float speedZ;
//Vector used to restrain the rotation to Z axis only.
public Vector3 vectorZ= new Vector3 (0f,0f,1f);
// Use this for initialization
void Start () {
speedX=5f;
speedZ=50f;
vectorZ.x = 0f;
vectorZ.y = 0f;
vectorZ.z = 1f;
}
// Update is called once per frame
void Update () {
//Horizontal Movement
float h = Input.GetAxis ("Horizontal");
transform.Translate (speedX * h * Time.deltaTime, 0, 0, Space.World);
//Rotation
float v = Input.GetAxis ("Vertical");
transform.Rotate(speedZ * vectorZ * v * Time.deltaTime, Space.Self );
}
}
The previous code will allow the object to move itself on the 'X axis' of the world by using the rigth and left arrows. This is achieved by using the Unity function Input.GetAxis("Horizontal") and transforming the object on the x axis using the transform.Translate(x,y,z,relativeTo).
To get the cannon rotating up and down, we use the transform.Rotate(eulerAngle,relativeTo) and the Unity function Input.GetAxis("Vertical") to have the up and down arrows to move the cannon's rotation on the 'Z axis'.
Since we will want the cannon interacting with the terrain and obstacles, we will need to add a Rigidbody to it. We do that by adding a component to the sphere and configuring it as below:
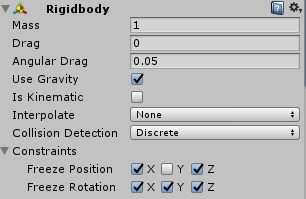
The constraints will make the physics engine to only calculate the interaction in the 'Y axis' and thus not dis-aligning our cannon.
Projectile:
Now we need to create a capsule on the scene and after we position it inside the cannon's body we drag the object from the hierarchy screen to the bottom 'Assets' section. This will have this object as a prefab or asset and we will be able to clone the object with all the characteristics of this object including the force that will allow it to be thrown.
Once we have the prefab added, we will need to add 3 components:
1) Rigidbody (to have it interact with the physics engine and gravity)
2) Constant Force(to have it fire whenever we instantiate a projectile)
3) Box Collider (this will allow the bullet to collide with other objects)
Next we need to create a C# script that will determine the behaviour of the projectile and attach it to the prefab as a component.
using System.Collections;
using System.Collections.Generic;
using UnityEngine;
public class Projectile : MonoBehaviour {
private Rigidbody rb;
//property //better accessor methods
private static Projectile instance;
public static Projectile Instance {
//public static GameObject Instance {
get {
return instance;
}
}
void Awake(){
instance = this;
//instance = this.gameObject;
}
// Use this for initialization
void Start () {
rb = GetComponent<Rigidbody> (); //retrieve a reference to a component
//rb.AddForce(new Vector3(0, 500, 0));
rb.AddForce(transform.up * 10 * 500, ForceMode.Impulse ); //up, right , foward are on global space
//these vectors are always unit vectors and you * times de scalar
}
// Update is called once per frame
void Update () {
}
public void OnBecameInvisible () {
Destroy(this.gameObject);
}
}
The OnBecameInvisible() method will destroy the projectiles once they go out of the frame that the camera is able to capture. This will save memory since the objects will be destroyed once they are no longer visible.
Instantiating (clone):
Now that we have our projectile ready, we need to come back to the cannon script to be able to instantiate this asset/prefab whenever we want to fire from the cannon using a keyboard key.
We require to add a reference to a gameobject that will be linked to the projectile prefab and some code on the Update() method.
public class Cannon : MonoBehaviour {
public GameObject original;
.
.
.
void Update(){
.
.
.
if (Input.GetKeyUp(KeyCode.Space)) { //Cloning
GameObject clone = Instantiate (original,
//GameObject clone = Instantiate (Projectile.Instance,
transform.position,
transform.rotation) as GameObject;
//make it at the same location that the canon
Rigidbody rb2 = clone.GetComponent<Rigidbody> (); //retrieve a reference to someone else's components
//Destroy (rb2);
}
The linking of the prefab to the variable 'original' is done by dragging the projectile prefab on to the variable in the inspector panel.
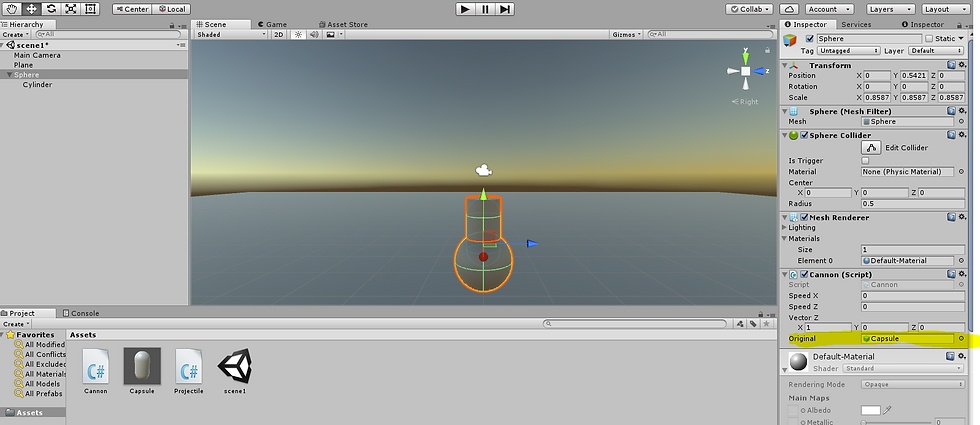
The cannon will now be able to fire projectiles by cloning instances of that prefab, but we MUST prevent collision between the cannon and the projectiles.
This will be achieved by using collision layers.
1) We select the Sphere (cannon) and at the top right of the Inspector pane we select the layer menu.
a) We then select 'Add Layer...' option and we create a layer called Cannon.
2) We now assign that layer to the Sphere (cannon).
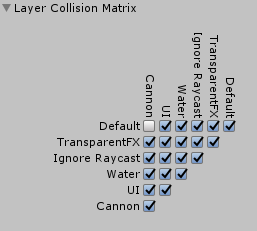
3) We now go on the main top menu to Edit > Project Settings > Physics, this will open the Layer Collision Matrix.
4) Since we have only changed the cannon to another layer, we can prevent the collision by removing the checkbox in the intersection of the Default layer and the Cannon layer.
Plane and Obstacles:
We now need to add a large rectangle to act as a terrain. When adding the plane you will notice that the bullets now collide against the floor.
The obstacles will be bouncy cubes that fall from a height into the floor.
To do this we will:
a) We make a right click on the Asset panel and click on Create > Physic Material and we name it Bouncy .
1) We select the material and put a bouncy value between 0-1
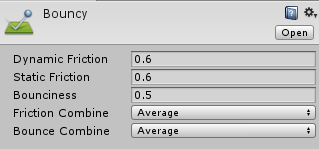
b) We now need to create a cube and scale it to the desired size, we now create it as a prefab by dragging it on to the assets screen.
c) We now select the prefab and add a Rigidbody to it, so that it can interact with the physics engine and select the bouncy material that we created on step a).
d) We now drag multiple instances of the prefab and we place them all over the scenario.
Lastly for this section we want the projectiles to collision with the obstacles and to be destroyed alongside the projectile that hit it. We will require to add a behaviour C# script to the obstacles in order to achieve this.
using System.Collections;
using System.Collections.Generic;
using UnityEngine;
public class Boxes : MonoBehaviour {
// Use this for initialization
void Start () {
}
// Update is called once per frame
void Update () {
}
void OnCollisionEnter (Collision c){
if (c.transform.name == "Projectile(Clone)" ) {
Destroy (c.gameObject);
Destroy (this.gameObject);
}
//print (c.transform.name);
}
}
This code will check if the collision object name is a clone of the projectiles and destroy both the object that collided and the instance of the object that invoked the method.
Multiplayer:
We now create a second cannon, located in front of the first cannon and we create a second behaviour script for this second player. It will be similar to the first one, but it will receive input from different keyboard keys and it will check for collisions of the projectiles launched by the first cannon.
Let's start by introducing the second C# script for the player 2
using System.Collections;
using System.Collections.Generic;
using UnityEngine;
public class player2B : MonoBehaviour {
public float speedX;
public float speedZ;
public GameObject original2;
public Vector3 vectorZ= new Vector3 (0f,0f,1f);
// Use this for initialization
void Start () {
//way to retrieve a reference
//original = originalTransform.gameObject;
//original = GameObject.Find ("Capsule"); //way to retrieve a reference //can return null
speedX=5f;
speedZ=50f;
}
void OnCollisionEnter (Collision c){
if (c.transform.name == "Projectile(Clone)") {
Destroy (c.gameObject);
Destroy (this.gameObject);
}
//print (c.transform.name);
}
// Update is called once per frame
void Update () {
if(Input.GetKey(KeyCode.H)){
transform.Translate (0, 0, speedX * -1 * Time.deltaTime, Space.World);
}
if (Input.GetKey(KeyCode.K)){
transform.Translate (0, 0, speedX * 1 * Time.deltaTime, Space.World);
}
if (Input.GetKey(KeyCode.U)){
transform.Rotate(speedZ * vectorZ * 1 * Time.deltaTime, Space.World );
}
if (Input.GetKey(KeyCode.J)){
transform.Rotate(speedZ * vectorZ * -1 * Time.deltaTime, Space.World );
}
// INSTANCING
// we can't create a new gameobject from scratch
// we have to clone
if (Input.GetKeyDown(KeyCode.Z)) { //Cloning
GameObject clone = Instantiate (original2,
//GameObject clone = Instantiate (Projectile.Instance,
transform.position,
transform.rotation) as GameObject;
//make it at the same location that the canon
Rigidbody rb2 = clone.GetComponent<Rigidbody> (); //retrieve a reference to someone else's components
//Destroy (rb2);
}
}
}
The particular thing to notice on this script is that we are using the letters 'U','J','H' and 'K' to control the 'X axis' and rotation movement. We also added the onCollisionEnter(Collision c) method to check for the collision with the projectiles.


Comments