How to collision objects on Unity
- Aug 29, 2016
- 5 min read
On this post we will overview how to configure the unity game to collision and destroy the objects that had the collision. This will include some basics on object creation, setting and coding of the scripts that will set the behavior on the collision event.

Enemies:
Let's assume that we want to create a couple of enemies that patrol the game area in a fixed horizontal line.
->Tip: We can use constrained math functions to create a looping on the movement, like a sine or cosine function which values varies between the interval: [-1,1].
The first step to set movement to objects on a unity game is to first create an object. Create a 3D object by clicking on the menu GameObject > 3D Object > <Select a form to insert>.
To indicate Unity how the object will move we must create a script for it. In this tutorial we will code on C#.
1) Create a new script called 'enemy' by clicking on the Create menu > C# under the Project tab.
2) Select on the scene menu the object that we created as an enemy.
a) On the Inspector tab click on the "Add Component" button at the bottom of the screen and look for the 'enemy.cs' script to attach it to the form.
-> Tip: On more complex scenarios we could attach several scripts to the same objects.
3) Double click on the script and corroborate that the class is named the same way as the script file name, in this case the class should be called 'enemy'.
Next we will present the code snippet and will explain what is happening:
using System.Collections;
using System.Collections.Generic;
using UnityEngine;
public class enemy1 : MonoBehaviour {
//constants
public float speed = 3;
private Vector3 startPos; //vector3: [x,y,z]
public float delta = 9.5f;
// Amount to move left and right from the start point AKA.. rango en el que se mueve el objeto
// Use this for initialization
void Start () {
startPos = transform.position; //transform.position: pone las coordenadas iniciales del objeto
}
// Update is called once per frame
void Update () {
//-----------------------------------------------
Vector3 v = startPos;
v.x += delta * Mathf.Cos (Time.time * speed);
//v.x += delta * Mathf.Sin (Time.time * speed);
//moviemiento objeto
transform.position = v;
//-----------------------------------------------
}
}
On the above code we have created 3 class attributes: speed, startPos and delta.
We will use both delta and speed to modify the position of the object.
The startPos variable is a Vector3 type object which has 3 attributes <x,y,z> on which we can store float values, we will use this attribute to get the initial position of the object.
The first method that we will analyze is the ‘void Start()’ function, this code snippet is run once at the time of initialization of the game. In here we set the startPos variable to the position of the object that has this script attached.
“void Update()” this method is invoked once per frame at run time. In here we will describe the movement of the object by resetting the position of the object (transform.position).
We create a local vector ‘v’ that will be used to set the position of the object, we also initialize that vector to the initial position of the object.
Since we only want to move the object in the horizontal axis, we change the x value of the vector by setting “v.x += value”.
We use the cosine math function of the Time.time system variable. This variable increases linearly while the time passes on the game, and since we are using a repetitive math function we can expect the values from that snippet to be of [-1,1].
speed: this float variable is used to multiply the linear increasing time variable and make it move quicker.
delta: this float variable is used to weight the steps that are added to the ‘v.x’ vector attribute. This will prevent the object from going too far away from the boundaries of the game screen.
We set the new position of the object by equating the object position vector to the local vector just modified.
Note: Since we are always referencing the start position of the object when creating the vector v, we will have our object to move around that fixed center, if we wanted the object to move on to a single section, we would make ‘v’ independent from the startPos variable.
Player:
After having an enemy move automatically from left to right, we require an object to represent the player.
a) Create a GameObject with a form of your choice
b) Add a C# Script to your object that will describe the object behaviour.
c) Add a 'Rigidbody' component to the object to allow it to collide with other objects

using System.Collections;
using System.Collections.Generic;
using UnityEngine;
using UnityEngine.UI; //libreria para usar texto en pantalla
public class SphereBehaviour : MonoBehaviour {
public float speed;
private Vector3 startPos;
// Use this for initialization
void Start () {
startPos = transform.position;
}
// Update is called once per frame
void Update () {
//posición de objeto en Y
float v = Input.GetAxis ("Vertical");
transform.Translate (0, v * Time.deltaTime * speed, 0);
}
}
This code snippet is similar to the ‘enemy’ code, with two differences on the Update method:
Since we want the player to move up and down we can use the Unity ‘Input.GetAxis(“Vertical)”’ library function.
This function returns -1 or 1 by tracking the keyboard arrows of the user.
transform.Translate(x,y,z), this will move the object current position the value passed as a parameter.
Game objective and collisions:
So far we haven’t established a game objective, but from the horizontal enemy movement and the players vertical movement you might have already guessed, we want the player to reach from one side of the screen to the other avoiding the collision with the enemy.
Each time the player reaches the other side he or she wins points.
This means that we will need to modify the script that describes the behaviour of the main character. On the player’s script, you must add a method called “OnCollisionEnter”. There are other collision methods: “OnCollisionStay” and “OnCollisionExit”.
(GOES inside the Update method)
void OnCollisionEnter (Collision c){
if (c.transform.name == "Enemy 1" || c.transform.name == "Enemy 2") {
score--;
//print (score);
//print ("collision with: " + c.transform.name);
} else {
score++;
//print (score);
//print ("collision with: " + c.transform.name);
}
transform.position = startPos;
UpdateScore ();
}
Score:
The score is always on screen. To display the score on the screen we must go first to our player’s script and add the next lines of code:
using UnityEngine.UI; // Library to use text on screen
public int score;
public Text TextoPuntaje;
public void UpdateScore ()
{
TextoPuntaje.text = "Score: " + score;
}
void Start () {
startPos = transform.position;
score = 0;
UpdateScore (); //para que salga el 0 al correr el juego
}
We create an integer variable called “score” to use it as an incrementer o decreaser of points when the player get’s touched (score--;) and when the player reaches the goal (score++;) as it’s seen on the Collision piece of code.
We create a second variable of type TEXT called “TextoPuntaje”.
To display the Score on the screen, first you must click on the menu GameObject > UI > Text.
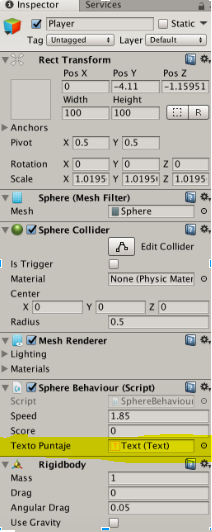
Once you’ve done step 3 you need to go to your player’s figure menu and you’ll see an empty text variable called “TextoPuntaje” which we’ve created earlier. Drag the Text GameObject to the empty space variable. It should look like this:


Comments